Showing posts with label blog. Show all posts

Monday, 30 March 2015

MEMEME Cosmetics: The Ultimate Eye Palette 'Classic'

Hi fab things,

I've been using the MEMEME Cosmetics Ultimate Eye Palette 'Classic' for the while and I'm enjoying it. 


You need a good primer for the shadow to last all day. The colours are gorgeous. I love the variety. The only downside for some people is the fact they are very talc but I don't mind it at all.  

It blends very easily and the colour pay off is very good overall. I've been contemplating buying this palette for months and months and I'm delighted I finally got around to it. 

It's quite handy if you're travelling you can pop it in your bag and go. I usually go for a light smokey brown eye for the day. 


The palette is €12.99 and you can get the one I have 'the Classic' or the 'Rich Plum' palette which will be my next investment. 

You can get the MEMEME cosmetics in most pharmacies or online at www.mememecosmetics.com

Until next time beauties,

A x

Monday, 12 January 2015

Contour and Highlight


Hey lovelies,

I hope everyone's January isn't going too bad. It really is one of those months that drags on isn't it? All the major festivities and partying has died down and its back to 'reality' with work, college or school. But its not all bad as new spring fashion comes out and there is always new makeup to be found and in my case reviewed!

Anyway today I'm going to talk about one of my favourite makeup steps: Contour and Highlight. This make up step really took off not so long ago and there has been a lot of enthusiasm about it. It is a case of hollowing out your cheekbones (while sucking your cheeks in making a duck face) and building on your own cheek bones, around the top of the forehead, down the nose (makes it look more narrow) and down along the jaw line for a more subtle defined look along with highlighting your features such as the top of the browbone, top of cheekbones, forehead, chin,nose, above the centre of the lip lip all to make your face look more oval and longer. It is a case of enhancing your own features but definition and brightness. 

I'm very excited to write this blog. I remember it was sometime in 2013 and the gorgeous beauty blogger Suzanne Jackson aka SoSueMe had a blog post about the sleek contour palette Here and then she brought out this Youtube video all about contouring. I was so excited to try it immediately and I wanted to find products similar to the ones she used.

So back in September 2013 I purchased the seventeen instant glow contour cream and the Rimmel Wake Me Up concealer as I thought they were a good combination to try out.

I remember googling what products to use to get some ideas and at the time American brands came up that I didn't have easy access to so these two products were perfect for me.
I used it the whole time. I love the colour of the seventeen cream bronzer as you can make it subtle or build it up for a night out. It completely changed the way my makeup looked. I also love the Rimmel Wake Me Up concealer and find that the two of the them compliment each other perfectly. I have only good things to say about this Rimmel product, it is the most amazing concealer/hightlighter. 

After I would set my whole face with translucent powder to keep it in place. Sometimes I would you C&H powders over my creams for a more defined contour look. 

A little tip, you can achieve Contour and Hightlight easily by either getting a powder two tones darker than your own one, like this MAC mineralize powder.


Or you can even a foundation that is two tones darker for the contour and two tones lighter for highlight.

FAVOURITE CONTOUR AND HIGHLIGHT PRODUCTS

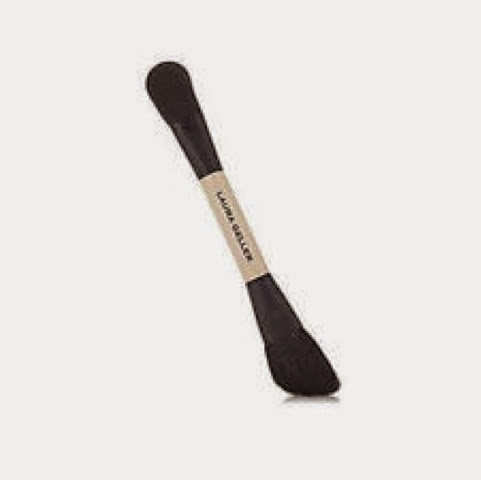
The Laura Geller Highlighter & Blush - Spice Chai/Fr.Vanilla. This is absolutely beautiful combination and it has amazing pigmentation. This Laura Geller brush is one of my favourite brushes to use for contouring, it is fab and you can easily hollow out the cheek bones. 

  
The MAC pro longwear concealer - though it is quite a heavy concealer so I would only use this if I was going to an event early in the day and needed all day coverage like a Wedding or a Ball. It has quite a heavy texture to it so I wouldn't use it as an everyday concealer - but other than that it is perfect for highlighting if you need something to last. 
I use this sleek palette everyday. Its gorgeous for a subtle warmth and brightness to the face. It can be used as an everyday C&H but you can also build it up at night for a deeper look.


In this picture, I was at a Wedding during the summer
and I used a mixture of the Seventeen cream bronzer and Rimmel Wake Me Up concealer/highlighter, but I also put the Sleek palette on over everything at the end
This is a little blurry but I used the Laura Geller highlighter, the sleek bronzer and blush. I love mixing things up and using different C&H

BRUSHES
Personally the brushes I would use mostly commonly for contouring and highlighting would be the Laura Geller angled brush 
and the Real Techniques Expert Face brush. I found the Real Techniques blush brush fab for highlighting and blush
as the tip is flexible so it can narrowly put product on or spread it out.

I would also like to say that any of these brushes here would be absolutely perfect for C&H :
Any Angled, Tapered or Flat top brush that can easily hollow out the cheek bones.

Here are some extra brushes as a guide:


I hope my Contour and Highlighting guide has helped with tips and you can take away something from it. I remember one of my friends asking me to contour her face and she said "the contouring trend came out of nowhere and it's something I'm terrified to even try it". It is something different that has only become very well known and big the last few years but there are so many brushes and products out there these days which is very handy as you're always bound to find it someway and on any budget.

I really enjoyed writing this blog post as its my absolutely favourite step in makeup.

All the products mentioned in this blog post can be purchased from:


Until next time beauties,

A x


Thursday, 20 November 2014

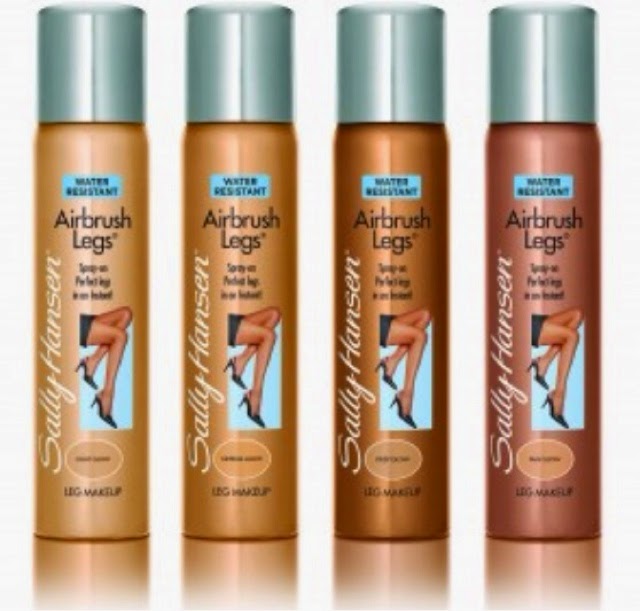
Top Tans: Sally Hansen Airbrush Legs Lotion And Spray

Hi lovelies, 

I hope you enjoyed my Cocoa Brown Tan review yesterday. The first in the "Series". So the next tan I'd like to share with you is an instant tan "Sally Hansen Airbrushed Legs". 

A bit of History about Sally. According to the website - it was a company set up by Sally and her husband in the 1950s primarily focused on nail care which I'm also a huge fan of but extended out to tan. "The philosophy was simple: educate the consumer and develop quality, practical products that were competitively priced and easy to use." Which it has stayed true to all this time. 

It comes  in a spray and more recent a lotion. It is probably one of the most popular instant tans I know. It is basically a flawless makeup for your legs. Also it may say for your legs but you can use it all over your body. I remember I was going to a friends birthday in the middle of summer and I was about 16 and I remember getting my Sally Hansen done and sure wasn't I just the bees knees haha.

You know those times when you agree to something last minute and it could be a night out? Well the amount of times I've said "go old reliable Sally". You literally grab it and go.

I will say it does have the ability to stain clothes as many of you might know. I've had to re-wash dresses and tops a lot due to Sally transferring but the trick is to give it enough time to dry in - at least a half an hour or longer if possible. 

While my tan dries I do my hair and make up - especially if I'm wearing something white, I give myself plenty of time. The spray has been around for years and year at this stage and it's a classic. I think it was April 2013 that Sally Hansen brought out a lotion and this was a huge thing. It was a bit pricey coming out around €16 but in more recent times I've seen it at €8-€12. I waited for a while to get it but I ended up getting it at €8 I was delighted. 

The spray and lotion both come in four different shades. The Spray comes in: Light Glow, Medium Glow, Deep Glow and Tan Glow. 

The Lotions are called: Light, Medium, Tan, Deep.

For anyone out there who would like to try out a tan - I'd 100% suggest Sally Hansen. It can be easily applied, built on but doesn't leave you with an orange colour. 

I have a lot of love for this tan. It has been here when I first started out with learning how to use tan and it's clearly here to stay! 

It can be purchased throughout pharmacies, Penneys/Primark, shopping markets, Dunnes. It retails from €7-€13. At the moment in some places there's a promotion to buy the the Tan (spray) with a Sally Hansen nailpolish so look out for that offer. It would save yourself some money and get the two for as much as€10-€12. It would be an ideal gift especially coming up to Christmas or a nice treat for yourself!

Of course it can be bought online at: 
feelunique.com
www.carapharmacy.com

Until next time beauties,

A x


Wednesday, 19 November 2014

Top Tans: Cocoa Brown 1hour Tan

Hi guys and dolls,

Instead of putting my Top Tans in one blog, I thought I'd spread them out. That way I can talk about each one in detail and how they work for me. 

The first one I'm going to start with: Cocoa Brown 1Hour Tan. 

(Image from: www.cocoabrown.ie)

I discovered this tan around January 2 years ago as one of my roomies Amy was doing her tan for a ball. The colour turned out amazing on her and straight away I thought I need this tan in my life. 

Cocoa Brown is an Irish brand by a woman named Marissa Carter who spotted a gab in the market for what I would probably call a salon tan in a can, excuse the cheese pun at a fantastic low, affordable price of €7-8. It can be purchased throughout Ireland and England and bought online and shipped to many countries. 

Most of us Irish girls, we absolutely love a tan for day to day and nights out, especially one that doesn't come out orange or isn't streaky or will come off in a flash. Cocoa Brown was the answer. 

She came out with a tan that can be put on your skin for 1-3 hours (depending on the colour you'd like it be), wash it off - leaving your skin with a glow and it will even continue to develop after it's been washed off. 

I will be honest and tell you my first experiences with the tan and how the tan worked for me. Before this the only time I ever got a tan that I washed off was a spray tan for my debs other than that it had always been instant. The first time I used it, I gave it a trial run just I see how it would work out for me as I was heading out in a few days. I followed all the exfoliation steps and my skin was all prepped and ready. I left it on for maybe 2 and half hours, washed it off, patted myself dry and I could see there was no colour left. I thought maybe it'll develop itself but the next day there was nothing. I was a bit worried because anyone I talked to or read reviews online it had worked perfectly for them. I gave it another try leaving it on for 3 hours and still nothing. 

I didn't want to give up so I read about how tans can pick up skin pigmentation differently with everyone so the next time I used it I put it on at midday and washed it off at 6pm that evening, hopped out of the shower to see a glowing colour.
 
have given advice to a few friends to leave it on for maybe 12 hours or even over night and wash it off the next day as everyone's pigmentation is different. 
I recently wanted a deeper colour so i decided to put it on at 9pm that night and washed it off at 9am the next day. 

9pm picture
Picture I took later that night after washing it off at 9pm. 

Most people I talk to 1-3 hours works perfectly but I have to leave mine on for about 6 hours for a colour to develop it all depends on how strong the colour can be picked up on the skin. 

I have used a lot of tans but this is still my go to tan - a Holy Grail of tans as I'd call it as the colour turns out absolutely beautiful, it's so so affordable and the colour can last up to 5-7 days (especially using the Cocoa Brown Chocolate Whip moisturiser). 

This a 100% recommendation. Fabulous brand. Also how fab is the packaging and colour?!

My advice if it doesn't work straight away do what I do and leave it on for a few more hours ,you'll see a difference and always exfoliate!! My top tips for prepping your skin for tan is up you can see it here: http://wonderstruck-beauty.blogspot.ie/2014/11/top-tanning-tricks-and-tips.html?m=1

(Image from: www.cocoabrown.ie)

Check out Cocoa Brown's other products on:

www.cocoabrown.ie

You can also purchase the 1hour tan and the other products featured on the website in Penneys, Primark, Superdrug, Boots and online at:

cloud10beauty.com 
feelunique.com
carapharmacy.ie

Happy buying - let me know what ou think of Cocoa Brown through here or my twitter @wonderbeauty8 or Facebook - all links on the right. :)

Until next time beauties,

A x


Tuesday, 18 November 2014

Top Tanning Tricks and Tips

Hi fab things,

I promised a tan blog and I'll deliver on it. 
This blog will be all about prepping your skin for the perfect tan.  


The absolute key to a perfect tan is prepping your skin: Exfoliate, Exfoliate, Exfoliate!! Can't stress that enough as it is the most important part of exfoliating. 

These are some of my top tips:

• Exfoliating can be done one day prior to tanning with an exfoliating glove. These can be picked up in pharmacies and Penneys/Primark for a €1 in a variety of colours.  

• With regards to shaving, it should be done at least two days in advance. 

• Some of my favourite exfoliators:
"Tough Stuff" - Cocoa Brown, The Sanctuary range, Clinque, Elemis and The Body Shop all have a great range of body exfoliators. Just to mention a few.

• If I'm not tanning I'd moisturise after showering but when tanning make sure you don't moisturise after exfoliating.  

• So the day of tanning - I like to take a shower in the morning using an oil-free body wash: I'd suggest one from the Neutrogena range. This is important so the tan won't have a barrier before it's applied. (I've learned this from past experiences)

• The absolute best way to apply tan is with a tanning mitt, these are also very cheap to pick up in Pharmacies and Pennes/Primark. Make sure to apply tan in circular motions - leave your hands until the end. When you're finished with your tan, there will be a little bit left on the glove and just use that. 

• After the tan is applied - give yourself plenty of time for it to dry and develop. Wear loose clothes and maybe hold of from doing anything that could work up a sweat just to give your tan a chance hehe. 

These are my top tanning tips. I will post my Top Tans in the next blog as a part 2. 

Until Next Time Beauties,

A x


Monday, 15 September 2014

Haul Time!

Hey fab beauties,

So I've decided to do my first haul as I picked up a variety of things yesterday when I was out shopping from; Penneys/Primark; Brown Thomas; Marks and Spencers.


I was in around Brown Thomas, Cork yesterday and I spotted the MAC counter. I need a new highlighter/concealer, I was all for heading over to Boots to pick up my favourite concealer - Rimmel 'Wake Me Up'.
E6.99

I have been watching a couple of youtubers lately and a lot of them seem to use MAC concealer so I said I'd pick it up and I will give it ago and do a review on it as soon as possible. I also picked up MAC's Studio Sculpt. The Concealer is E21.50 and the Foundation is around E31.50. MAC is not my everyday, go to product as I can only buy them every so often because it can be expensive for a student so MAC is definitely a huge treat to get and it lasts absolutely ages.


I used the foundation a few years ago when I was experimenting with make up so I'm going to give it another try (I feel like the concealer and foundation needed to be matched up, thats my excuse hehe).

So the next items I picked up were from Marks and Spencers, their own brand of make up called the 'Limited Collection'. They come in at about E6-7 each.


I loved the packaging straight away, very eye catching. I got the matte bronzer, in the shade light and the blusher, in the shade apricot.

The matte bronzer is perfect for autumn. I prefer matte to sparkle. So I'll have a review about these cute things soon.

The next spot I headed to was of course, Penneys/Primark. I picked up a few bits unrelated to beauty here.
 

I picked up a cute, colourful laundry bag. Its just so pretty.
I also picked up Nivea wipes 2 for a strange E4.46, theyre for dry/sensitive skin. I use wipes on my face before I cleanse in the morning and at night. I also got some little slippers E1.50


Also I got a travel bag for E15, that can be turned in a suitcase and the pattern is fab.

I also bought such a cute macaroon lipgloss E1.50


A random little thing but it was so pretty and smells so sweet.


I can't wait to review my bits and pieces for you fab things. Happy Haul! 

Until next time beauties,

A x

This is my little girl.  I tell her, even when she is the most lonely and nobody sees her--I see her, because I've been that lonely girl and she will never have to be.

Thursday, 11 September 2014

FOTD

Hey fab things,

I've picked a little random FOTD: Vanilla Coke. 

I found it one day while out shopping with my boyfriend (he's a massive fan of vanilla coke!!)

 It's hard to come across this flavour coke, I remember having it a few years ago once or twice and it was lovely. I'm not the biggest fan of coke but I'd have it every now and again. So we picked up one or two of these at the 'olde time sweet shops' around the country and we were happy out.


Until next time beauties,

A x